Google Chrome浏览器扩展程序开发
浏览器开发工具框架
https://github.com/PlasmoHQ/plasmo
~Plasmo~ 框架是一款黑客为黑客打造的功能强大的浏览器扩展程序软件开发工具包(SDK)。使用 Plasmo 来构建你的浏览器扩展程序,不需要操心扩展的配置文件和构建时的一些奇怪特性。
它就像浏览器扩展界的 ~Next.js~ !
Chrome扩展开发工具(Vuejs3+Vite):crxjs 2k starts
crxjs/chrome-extension-tools: Bundling Chrome Extensions can be pretty complex. It doesn’t have to be.
[不推荐]
alibaba/browser-extension-kit
概览
Chrome扩展是包含HTML,css,javascript,图片及一些其他资源的压缩包,它可以对Chrome浏览器的功能进行扩展或自定义。扩展是使用Web技术构建的,它可以使用浏览器提供的开放API。
扩展使得chrome成为了最具个性化的浏览器(人人都能根据自己的需要进行个性定制)。
扩展包含的文件:
每个扩展都包含不同类型和数量的文件,但他们都有一个manifest清单文件,里面包含了扩展相关的基本信息。
扩展程序必须有一个位于浏览器工具栏图标,图标允许用户轻松访问,并让他们知道当前安装了那些扩展。大多数用户通过点击工具栏图标弹出的popup与扩展进行交互。


文件引用
在扩展中,可以使用相对URL引用文件,就好像在普通的HTML中一样
<img src = “images / my_image.png” >
此外,还可以使用绝对URL路径访问文件:
chrome-extension://<extensionID>/<pathToFile>/
在绝对URL路径中,是扩展系统为每个扩展生成的唯一标识符。可以在chrome://extensions 页面查看所有的扩展的ID。
在处理解压的扩展时,扩展ID可能会有变化,所以,通常使用下面的方法获取扩展ID,避免在扩展中直接硬编码:
chrome.runtime.getURL()
项目结构:
- manifest :配置清单
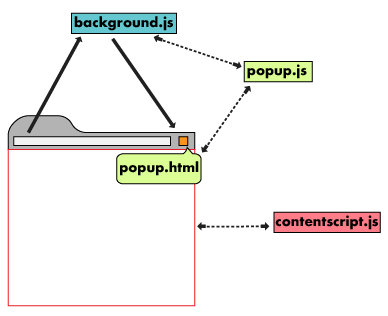
- background script: background script是扩展的事件处理器,在后台运行,监听浏览器行为,当浏览器触发了特定事件时,执行chrome扩展相关逻辑
- ui elements:chrome 的 extension’s user interface ,用于与用户交互,大多数插件包含browser action或page action,以及一些其他形式,如右键菜单,弹窗或键盘快捷键等。
chrome扩展的ui,例如 popup ,就是1个普通的html页面。
- content script: content script ,用于读写具体的web页面,其中包含的js脚本,会在web页面加载到浏览器后执行,可用于操作DOM。

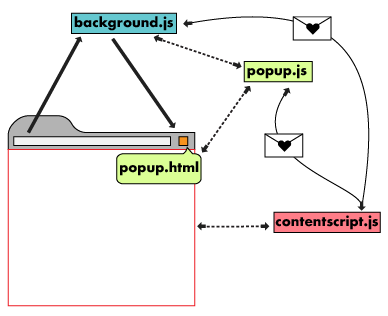
content script可以通过交换 messages 或者利用 messages API存储字段值,来与扩展的其他部件进行通信

options page:设置页面,正如扩展允许用户自定义chrome浏览器一样, options page 允许用户对扩展进行自定义。用户可以根据自己的需要,在options page对扩展的某些功能进行设置。
使用chrome APIs
除了可以使用web页面的API之外,扩展还能使用Chrome提供的专用API extension-specific APIs 与浏览器深度交互。例如,扩展和普通web页面都能使用window.open()来打开URL,但是扩展能通过tabs.create()来指定在哪个浏览器窗口打开该URL。(指的是开了多个chrome实例的情况下)
同步方法和异步方法
大部分的chrome API是异步的,它们会立即返回结果,而不会等待操作结束才返回。如果扩展需要直到异步操作的结果,一般需要通过传入回调函数来实现。回调会在稍后执行,有可能相当久后才执行。
例如,扩展需要把用户的当前tab页跳转到新的URL,它需要先获取当前的tab ID,然后更新这个tab的地址到新的URL:
    //使用异步回调,而不是同步
  chrome.tabs.query({'active': true}, function(tabs) {
    chrome.tabs.update(tabs[0].id, {url: newUrl});
  });
  someOtherFunction();
下面是一个同步API的例子:
  //同步方法没有回调函数,直接返回对应数据
  string chrome.runtime.getURL()
更多API细节,可以参考 Chrome API reference docs
页面通信:
扩展中的不同组件通常需要进行互相通信,不同的HTML页面可以通过chrome.extension中的方法来发现对方,例如getViews()和getBackgroundPage()。当一个页面关联到了扩展的其他页面,它就可以触发其他页面上的函数,并且操作页面DOM。另外,扩展中的所有组件都能通过 storage API进行值的存取,通过 message passing 进行通信。
数据存储及隐身模式
扩展可以使用 storage API,、HTML5的 web storage API 或发送用于存储数据的网络请求来存储数据。当扩展需要存储数据时,首先需要考虑的是它是否来自隐身窗口,默认情况下,扩展不会在隐身窗口运行(隐身窗口需要用户手工重新启用扩展)。
隐身模式承诺不会对用户进行追踪。当处理来自隐身窗口的数据时,扩展需要遵守这个承诺。如果正常情况扩展会保存浏览记录,那么,不要保存来自隐身窗口的历史记录。然而,扩展还是可以在任何窗口存储自身的配置选项,无论是不是在隐身模式下。
要检测一个窗口是不是处于隐身模式,直接检查相关tabs.Tab或windows.Window对象的incognito属性即可:
function saveTabData(tab) {
  if (tab.incognito) {
    return;
  } else {
    chrome.storage.local.set({data: tab.url});
  }
}
下一步
当看完本文及 Getting Started 教程后,开发者应该可以开始开发自己的扩展了。
想要深入Chrome扩展开发,可以参考一下内容:
- Learn about the options available for debugging Extensions in the debugging tutorial .
- Chrome Extensions have access to powerful APIs above and beyond what’s available on the open web. The chrome.* APIs documentation will walk through each API.
- The developer’s guide has dozens of additional links to pieces of documentation relevant to advanced extension creation.
Get started
扩展由不同但有凝聚力的组件构成。组件可以包括 background scripts , content scripts , options page , UI elements 和各种逻辑文件。扩展组件使用Web开发技术创建:HTML,CSS和JavaScript。扩展程序的组件将取决于其功能,可能不需要每个选项。
本教程将构建一个扩展,允许用户更改 developer.chrome.com 上任何页面的背景颜色。它将使用许多核心组件来介绍它们的关系。
首先,创建一个新目录来保存扩展程序的文件manifest.json
{
    “name”: “Getting Started Example”,
    “version”: “1.0”,
    “description”: “Build an Extension!”,
    “manifest_version”: 2
  }
保存manifest.json的目录即是扩展目录,可以在浏览器中打开chrome://extensions 并载入UNPACKED extension的方式进行使用和测试。
添加说明
虽然扩展已经被安装,但是它还没有相关的说明,可以在扩展目录创建一个文件名为background.js的background script,background script及其他的组件,必须在manifest文件注册。manifest中注册的background script会指导扩展的行为。
  {
    “name”: “Getting Started Example”,
    “version”: “1.0”,
    “description”: “Build an Extension!”,
    “background”: {
      “scripts”: [“background.js”],
      “persistent”: false
    },
    “manifest_version”: 2
  }
如上图所示,扩展现在知道它已经包含一个非持久性后台脚本background.js,并会扫描已注册的文件以查找它需要监听的一些重要事件。该扩展安装完成后就需要一个来自持久存储变量的信息,它通过chrome.runtime.onInstalled.addListener接口实现。这个变量同样也允许扩展的其他组件进行访问和更新。
chrome.runtime.onInstalled.addListener(function() {
    chrome.storage.sync.set({color: ‘#3aa757'}, function() {
      console.log(“The color is green.”;
    });
  });
大多数API,包括storage API,都必须在permissions字段里面注册:
 {
    “name”: “Getting Started Example”,
    “version”: “1.0”,
    “description”: “Build an Extension!”,
    “permissions”: [“storage”],
    “background”: {
      “scripts”: [“background.js”],
      “persistent”: false
    },
    “manifest_version”: 2
  }
在浏览器中重新载入扩展,打开js console,会发现输出了“The color is green.”
引入UI
扩展可以拥有许多不同形式的UI,当前这个扩展会使用popup,在扩展目录创建一个名为popup.html的文件,它通过点击一个按钮来改变网页背景色:
 <!DOCTYPE html>
  <html>
    <head>
      <style>
        button {
          height: 30px;
          width: 30px;
          outline: none;
        }
      </style>
    </head>
    <body>
      <button id=“changeColor”></button>
    </body>
  </html>
与background script类似,这个文件需要注册到manifest文件的page_action字段
{
    “name”: “Getting Started Example”,
    “version”: “1.0”,
    “description”: “Build an Extension!”,
    “permissions”: [“storage”],
    “background”: {
      “scripts”: [“background.js”],
      “persistent”: false
    },
    “page_action”: {
      “default_popup”: “popup.html”
    },
    “manifest_version”: 2
  }
下一步,要为popup按钮添加颜色,需要创建一个popup.js文件:
let changeColor = document.getElementById(‘changeColor’);

  chrome.storage.sync.get(‘color’, function(data) {
    changeColor.style.backgroundColor = data.color;
    changeColor.setAttribute(‘value’, data.color);
  });
并且, 在popup.html文件中引用popup.js
<!DOCTYPE html>
<html>
…
  <body>
    <button id=“changeColor”></button>
    <script src=“popup.js”></script>
  </body>
</html>
浏览器重载扩展后,可以看到popup 里面的按钮已经有颜色。
逻辑处理
前面的步骤完成后,需要为popup按钮添加具体逻辑
let changeColor = document.getElementById(‘changeColor’);
  …
  changeColor.onclick = function(element) {
    let color = element.target.value;
    chrome.tabs.query({active: true, currentWindow: true}, function(tabs) {
      chrome.tabs.executeScript(
          tabs[0].id,
          {code: ‘document.body.style.backgroundColor = “’ + color + ‘”;’});
    });
  };
用户在点击按钮后,改变网页背景色的代码会注入到页面上。
manifest文件中需要注册activeTab权限,以便扩展可以访问tabs API,因为上面用到了tabs.executeScript
{
    “name”: “Getting Started Example”,
  …
    “permissions”: [“activeTab”, “declarativeContent”, “storage”],
  …
  }
至此,扩展已经完全能够正常工作了。
提供用户配置选项
目前,扩展程序仅允许用户将背景更改为绿色。通过提供选项页面,用户可以更好地控制扩展程序的功能,进一步自定义其浏览体验。
首先在扩展目录中创建一个options.html文件,并包含以下代码
<!DOCTYPE html>
  <html>
    <head>
      <style>
        button {
          height: 30px;
          width: 30px;
          outline: none;
          margin: 10px;
        }
      </style>
    </head>
    <body>
      <div id=“buttonDiv”>
      </div>
      <div>
        <p>Choose a different background color!</p>
      </div>
    </body>
    <script src=“options.js”></script>
  </html>
然后,在manifest中注册选项页面
{
    “name”: “Getting Started Example”,
    …
    “options_page”: “options.html”,
    …
    “manifest_version”: 2
  }
在浏览器中重载扩展,已经可以看到扩展拥有选项页面。
最后一步,需要为选项页面编写业务逻辑。创建options.js文件,并包含以下代码:
let page = document.getElementById('buttonDiv');
  const kButtonColors = ['#3aa757', '#e8453c', '#f9bb2d', '#4688f1'];
  function constructOptions(kButtonColors) {
    for (let item of kButtonColors) {
      let button = document.createElement('button');
      button.style.backgroundColor = item;
      button.addEventListener('click', function() {
        chrome.storage.sync.set({color: item}, function() {
          console.log('color is ' + item);
        })
      });
      page.appendChild(button);
    }
  }
  constructOptions(kButtonColors);
选项页面为用户提供了4中颜色,当用户点击按钮时,存储的背景色的值就会更新。
下一步
至此,该扩展已经完成。了解更多内容,请参考:
- The Chrome Extension Overview backs up a bit, and fills in a lot of detail about the Extensions architecture in general, and some specific concepts developers will want to be familiar with.
- Learn about the options available for debugging Extensions in the debugging tutorial .
- Chrome Extensions have access to powerful APIs above and beyond what’s available on the open web. The chrome.* APIs documentation will walk through each API.
- The developer’s guide has dozens of additional links to pieces of documentation relevant to advanced extension creation.
在 Chrome 扩展开发中,inject script 和 content script 是两种不同的脚本类型,它们各自有不同的用途和特性。
1. Content Script
定义:
- Content script 是由扩展直接注入到网页中的 JavaScript 代码,它在特定的网页上运行,能够访问和修改网页的 DOM。
⠀特性:
- 隔离环境:内容脚本运行在与网页不同的 JavaScript 环境中,不能直接访问网页的全局变量或函数,反之亦然。这样可以防止扩展和网页之间的变量冲突。
- 权限:内容脚本的权限由扩展的 manifest.json 文件中的 permissions 和 matches 字段定义。
- 事件监听:可以使用 chrome.runtime API 进行消息传递,与背景脚本进行通信。
2. Inject Script
定义:
- Inject script 是指通过内容脚本动态插入到网页中的 JavaScript 代码。它可以是从扩展加载的脚本文件,也可以是直接在内容脚本中创建的代码。
⠀特性:
- 共享环境:与内容脚本不同,注入的脚本在网页的上下文中执行,能够直接访问网页的全局变量和 DOM。
- 无隔离:由于注入的脚本在网页环境中执行,所以它可以与网页的 JavaScript 进行交互,但这也带来了潜在的冲突风险。
- 使用场景:常用于需要与网页交互的情况,例如修改现有的 JavaScript 代码,或者需要获取网页上某些元素的值。
总结
- Content Script: 运行在扩展的隔离环境中,不能直接访问网页的变量和函数。主要用于修改网页的内容和与背景脚本通信。
- Inject Script: 运行在网页的上下文中,可以直接访问网页的变量和函数。适用于需要与网页进行紧密交互的场景。
- 如果inject script要使用chrome API(例如获取storage配置项), 则需要window.postMessage到content.js ,让content.js代为获取。
⠀了解这两者之间的区别可以帮助你更好地设计和实现你的 Chrome 扩展功能。
